That's right, I finally got my terrarium on! After seeing all kinds of cool posts about terrariums I picked up two small glass bowls with the plan to create a terrarium for myself. That was two months ago! Since then my glass bowls collected dust in the extra bedroom, well I should say inside a canvas bag in the bottom of the closet. Well last week I finally went out shopping for all the various items needed to create my new indoor garden masterpiece. I scooped up everything I needed from Wal-Mart, Lowes, and AC Moore. Here are my supplies-
So, yeah I went a little crazy. In reality you do NOT need all of these items but I intended to make several different terrariums: a mother's day gift, a housewarming gift, and uh a few for me! Here are a few close ups of some of the plants I chose. The first time I went in search of succulents I came up empty handed. But this time, my local Lowe's had a HUGE and interesting selection. It was pretty had to narrow it down because all of them were pretty neat looking. I do wish that the tags on the pots had more detailed information- they all said "succulent" and recommended high light.
This little guy is my favorite! I affectionately named him the "dinosaur toe." How cute/weird is this guy?!
From Wal-mart:
Aqua rocks in 4 varieties
Activated charcoal
potting soil
giant glass bowl
Lowes:
Various succulents
AC Moore:
Art sand
river rocks
garden greenhouse
All the items were really easy to find. The weirdest one is the activated charcoal which I located in the fish tank aisle in Wal-Mart.
The first piece I wanted to work with was the giant glass bowl, or what would later be deemed the "mini-garden parfait" by a recent house guest. To start, I lined the bottom of the bowl with rocks.
Next up, I added a layer of activated charcoal and then sand. Some tutorials suggested adding a layer of sphagnum moss to act as a barrier between the rocks and sand but I opted out. I think next time I will try this, as I noticed a lot of sand went right on through the rocks.
Next up, I spooned in some potting soil. Mmmm, a spoonful of dirt make the medicine go down! I spooned in about half of the soil, which allowed me to poke holes with my fingers to make little beds for my new plants.

Next was to arrange the plants I chose. I started with the tallest to help anchor my design. I dug down a big with my hand dandy spoon and set it into place. Then I added a bit of soil around it.
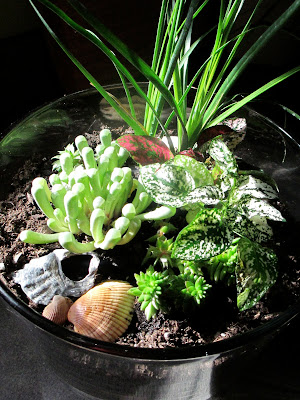
I then continued to add various succulents repeating the same process. I ended up breaking up some of the larger plants featured above so that I could use them in a few of my creations. So after some arranging, I ended up with this "mini-garden parfait"!
As I stated I was making a a few as presents, and this one was intended for my grandma who lives on the river. So I wanted to stick with the beachy theme. I chose the succulent in front because of its similarity to a sea anemone. After I arranged all the plants, I wanted to add some more interest by adding a few seashells. I had some seashells on reserve from last year's beach trip- I always try to got seashell hunting! But if you don't I discovered that you can also buy them at the craft store.
I am so pleased with the way this project turned out! I absolutely love it! And I really think it will look great in my grandma's sunroom.
I also made a few other terrariums with the rest of my plants. I used a ball jar and made a mini-terrarium for my neighbor's housewarming party as a gift. I followed the same process as above, and I found that working with the smaller opening was not an easy task. I found the spoon I used for dirt quite handy!
Lastly I made two mid sized ones for myself! Here's a picture of one. I forgot to snap a photo of the other before I transported it to school to hang out in my windowsill. They are almost identical and feature the two bowls I thrifted a few months back.
So there's my terrarium wrap up! All in all, an easy project. I used lots of different websites for reference (this, this and this). The only downside is the mess it makes! I would highly suggest doing this project outdoors. I was working at night, so I was limited to the indoors. Also I'd suggest not going crazy in the succulent section like myself, and stick to a smaller amount of plants. (It worked out for me though, because I used my left over plants elsewhere which I'll share later!)
Next up is to turn this baby...
...into a swank terrarium. I scored this guy at AC Moore for $17.99! I've seen like items online for up to $300! What a score! I've got some more reading to do since it will be a closed terrarium, but I'm pretty excited!
Happy planting!


Thanks for posting this, I am doing a terraium project with my oldest when he gets out of school for the summer and this helps alot! expecially where to find all the supplies.
ReplyDeleteAwesome! Send me a picture of your creation! And good luck!
ReplyDelete